M-LOK: Lighter, lower-profile, dominant on modern AR builds. Brinyte lights need a M-LOK-to-Picatinny rail section adapter (3-slot, ~$10–15) installed first, then the light clamps onto it.
Offset position (1:30 / 10:30): Eliminates barrel shadow, improves ergonomics. Mount as far forward as possible — lens behind the muzzle device, light body not overhanging the handguard.
✔ M-LOK users who want to mount Brinyte XP22 MK3 or T40
✔ Anyone who has dealt with laser zero shift after a battery change
✔ Shooters comparing Picatinny vs M-LOK for their build

1. Picatinny vs M-LOK: What Actually Matters for Weapon Lights
Most mounting guides compare Picatinny and M-LOK as a general accessories question. For weapon lights specifically, one distinction dominates all others: does your light mount directly, or do you need an adapter?
| Factor | Picatinny (MIL-STD-1913) | M-LOK |
|---|---|---|
| Standard | MIL-STD-1913 — military spec since 1995 | Magpul open standard — industry dominant since ~2017 |
| Brinyte XP22 MK3 / T40 compatibility | ✓ Direct mount — included Picatinny clamp fits immediately | ⚠ Requires M-LOK-to-Picatinny adapter first (see Section 2) |
| Weight vs. full quad-rail | Heavier — full-length rail on all 4 sides | 4–8 oz lighter — rail only where you need it |
| Accessory ecosystem | Widest — every tactical accessory ever made has Picatinny version | Large and growing — covers all major lights and grips |
| Profile under optics | Higher — raised rail adds height | Flush with handguard — slim profile |
| USSOCOM test (NSWC Crane, 2016) | Solid performer | Outperformed KeyMod in repeatability, drop retention, failure load |
| Preferred for | Duty rifles, quad-rail systems, maximum compatibility | Home defense builds, competition, modern slim handguards |
For weapon light mounting, Picatinny vs M-LOK is not primarily a weight or profile question — it is a direct-mount vs adapter-required question. The Brinyte XP22 MK3 and T40 use Picatinny clamps. Picatinny handguard users mount directly. M-LOK handguard users must first install a 3-slot M-LOK-to-Picatinny rail section, then mount the light. The adapter adds less than one ounce and costs $10–15 from brands like Magpul or UTG.
🗺️ Which Rail Do I Have? Quick Identification
📍 You Have Picatinny If...
- Raised metal rails with evenly spaced transverse slots
- Accessories clamp onto the outer edges of the rail
- Quad-rail handguards (4 full rails)
- Older military-spec rifles and carbines
📍 You Have M-LOK If...
- Rectangular slots cut directly into handguard surface
- Accessories use T-nuts that rotate 90° into the slot
- Slim, lightweight modern handguards (BCM, Geissele, Daniel Defense)
- No raised rails — flush, smooth surface between slots
📍 You Have Both (Hybrid) If...
- M-LOK handguard with a separate Picatinny rail section already installed
- Top rail is Picatinny (for optics), sides and bottom are M-LOK
- Common on most modern AR15 free-float handguards
2. M-LOK Users: How to Mount XP22 MK3 or T40 (Complete Adapter Guide)
The XP22 MK3 and T40 include a Picatinny clamp mount. If your handguard is M-LOK, you need one additional component: a M-LOK-to-Picatinny rail section — a small aluminum or polymer piece with M-LOK slots on the bottom and a standard Picatinny rail on top.
M-LOK Adapter Installation Process
-
Verify your firearm is unloaded
Remove the magazine. Lock the bolt back. Visually and physically inspect the chamber — confirm clear every time, without exception. This is a non-negotiable safety step before any work on the firearm. -
Choose your mounting position on the M-LOK handguard
Select the slot position on your handguard. For the XP22 MK3 and T40, the recommended position is the 1:30 or 10:30 offset position (left or right side, near the front of the handguard). This minimizes barrel shadow and puts the light where your support hand can activate the pressure switch naturally. Avoid the 6:00 position — it creates maximum barrel shadow. -
Install the M-LOK-to-Picatinny adapter
Slide the T-nuts into the M-LOK slots at approximately 45° angle, then rotate 90° so they lock behind the handguard wall. Using a 1/8" hex (Allen) wrench, tighten the M-LOK screws to 30 in-lbs. Apply one drop of Loctite 242 (blue) to each screw before tightening. Do not exceed 35 in-lbs — over-torquing can crack polymer handguards or damage the slot. Confirm the adapter is seated flush with no rocking. -
Mount the XP22 MK3 or T40 onto the adapter
Slide the light's Picatinny clamp onto the adapter rail from the rear. Ensure the light body clears the muzzle device and does not overhang the front of the handguard. Tighten the light body clamp screws to 20 in-lbs with Loctite 242. For the XP22 MK3: confirm the laser head and light head are both forward of any barrel shadow. For the T40: verify the zoom head can rotate freely without obstruction. -
Function test and dry-fire check
With the firearm confirmed unloaded, perform a full dry-fire function test. Activate the light with your support hand in firing position — verify you can reach the switch without breaking your grip. Cycle through all modes. Check that no part of the light or mount moves during simulated recoil (slap the handguard firmly). Then verify laser zero if applicable. Record your zero in case future checks reveal drift.
The Brinyte XP22 MK3 and T40 use standard Picatinny clamp mounts. M-LOK handguard users install a 3-slot M-LOK-to-Picatinny rail section adapter (aluminum, ~$10–15) first, then mount the light as they would on any Picatinny rail. Adapter screws torque to 30 in-lbs; light body screws to 20 in-lbs. Both require Loctite 242 and post-live-fire re-check. Total installation time: under 10 minutes.
3. XP22 MK3 vs T40: Which Weapon Light for Your Build?
Both the XP22 MK3 and T40 are rail-mountable and compatible with Picatinny and M-LOK (via adapter). Their core use cases are different — choose based on your rifle's optics configuration and primary mission.
| Specification | XP22 MK3 ⭐ | T40 |
|---|---|---|
| Max output | 1,600 lumens (white LED) | 1,650 lumens (white LED) |
| Beam distance | 374m | 490m |
| Candela | 35,000 cd | 12,500 cd (High) / 60,000 cd (Low-Spot) |
| Profile height | 14.55mm — clears all LPVOs and red dots | Standard round body — check optics clearance |
| Green laser | ✓ Class IIIa, independent switch | ✗ No laser |
| Zoom | ✗ Fixed dual-head beam | ✓ 6°–70° adjustable |
| Color options | White + green laser only | White / Red / Green / IR850 / IR940 / UV |
| Charging | Magnetic USB — charge on the rail, no removal needed | Hidden USB-C under tailcap |
| Battery | Built-in 1,100mAh Li-Po (non-removable) | 21700 5000mAh (removable, USB-C on battery) |
| Max runtime | 65 minutes (High) | 1h 50min (High) / 3h 45min (Low) |
| Waterproof | IP66 (powerful water jets) | IPX8 (2m submersion) |
| Best mission | LPVO / red dot rifles needing ultra-low profile + laser | Multi-role: long-range hunting, IR, multi-color |
🔦 Brinyte XP22 MK3 — Ultra-Low Profile Rifle Light with Green Laser
The XP22 MK3's defining feature is its 14.55mm housing height — low enough to clear virtually any LPVO or red dot without obstructing the lower sight picture. It delivers 1,600 lumens and a Class IIIa green laser in the same housing, with independent left/right switches — no mode cycling under stress.
- 1,600 lumens white LED + Class IIIa green laser — independent switches
- 14.55mm profile height — clears all LPVOs, prism scopes, and red dots
- Magnetic USB charging on the rail — no disassembly, no laser re-zero risk
- IP66 waterproof, 500 recoil tests validated
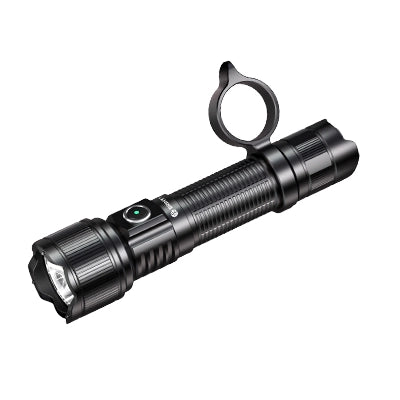
🔦 Brinyte T40 — Zoomable Multi-Color Weapon & Field Light
The T40 prioritizes beam versatility and multi-color capability over ultra-low profile. Its 6°–70° zoomable beam converts between a 490m spot for target identification at distance and a wide flood for close-range area coverage. Available in six LED colors including IR850 and IR940 for night vision.
- 1,650 lumens / 490m beam distance — highest throw in the Brinyte lineup
- 6°–70° zoom — spot to flood without changing lights
- Six LED options: White / Red / Green / IR850 / IR940 / UV
- IPX8 (2m submersion) — most waterproof in the lineup
If your rifle runs an LPVO, prism scope, or low-mounted red dot and you need both illumination and laser targeting — the XP22 MK3's 14.55mm profile height is the correct answer. If your primary mission is night hunting with night vision or multi-color capability, the T40's IR modes and 490m throw are the differentiating factors. Both mount identically on Picatinny rails; both require a M-LOK-to-Picatinny adapter on M-LOK handguards.
4. Mount Position: Where to Put the Light on Your Handguard
Mount position affects barrel shadow, ergonomics, and pressure switch access more than any other installation decision.
| Position | Clock Position | Pros | Cons | Best For |
|---|---|---|---|---|
| Offset (recommended) | 1:30 or 10:30 | Minimal barrel shadow; natural support-hand access; light stays below optic | Requires offset mount or M-LOK adapter at angle | Most rifle and PCC setups |
| Bottom (6:00) | 6:00 | Simple; uses existing bottom rail on many handguards | Maximum barrel shadow; awkward switch access; snags on gear | Not recommended for tactical use |
| Top (12:00) | 12:00 | Strong illumination straight ahead | Blocks optic view; obstructs sights | Not recommended — conflicts with optics |
| Side (3:00 or 9:00) | 3:00 / 9:00 | Works for dedicated support-side hand | Moderate barrel shadow | Fixed-position defense setups |
The 1:30 or 10:30 offset position — as far forward as possible on the handguard, lens behind the muzzle device — is the tactically correct weapon light position for the majority of rifle configurations. It eliminates barrel shadow, positions the activation point where the support hand naturally rests, and keeps the light body below the optic's field of view.
5. Complete Weapon Light Installation — Step by Step
This covers Picatinny direct mount. For M-LOK users, complete Section 2 first (adapter installation), then continue from Step 3.
-
Safety check — verify firearm is unloaded
Remove magazine. Lock bolt back. Visually and physically inspect chamber. -
Gather tools and materials
Hex wrench set, torque driver (in-lb), Loctite 242 (blue), clean cloth. -
Select and mark the mounting position
Choose 1:30 or 10:30 offset near front of handguard. Lens behind muzzle device. Verify support hand can reach switch naturally. -
Apply thread locker and mount the light
One drop Loctite 242 per screw. Tighten alternately. Torque to 20 in-lbs for light body screws. -
Verify light body clearance
Confirm no contact with barrel or gas block. XP22 MK3: confirm 14.55mm height does not contact optic. -
Function test and zero check
Activate all modes from firing position. Verify laser zero. Record settings. -
Post-live-fire check (after first 50 rounds)
Re-torque all screws. Re-verify zero. Reapply Loctite if needed.
6. Torque Specifications & Thread Locker Reference
| Fastener Type | Torque Spec | Thread Locker | Notes |
|---|---|---|---|
| M-LOK adapter screws | 30 in-lbs | Loctite 242 (blue) | Do not exceed 35 in-lbs on polymer handguards |
| Light body to Picatinny mount | 20 in-lbs | Loctite 242 (blue) | Alternate tightening side-to-side for even seating |
| Picatinny clamp to rail | 20–25 in-lbs | Loctite 242 (blue) | Check that clamp does not rock on rail before full torque |
| Remote pressure switch screws | 15 in-lbs | Optional: 222 (purple) | Purple Loctite preferred — easier removal for position adjustment |
The two critical torque values for weapon light mounting are 30 in-lbs for M-LOK adapter screws and 20 in-lbs for light body mount screws. Both require Loctite 242 blue medium-strength thread locker. Without thread locker, recoil will loosen any mount — typically within 50–100 rounds. These values are consistent with Arisaka Defense's published M-LOK mount specifications.
7. Candela vs Lumens: What Actually Matters for a Weapon Light
For a weapon light, candela is the more important number. Lumens measure total light output; candela measures beam intensity and determines identification distance.
| Metric | What It Measures | Weapon Light Relevance |
|---|---|---|
| Lumens | Total light emitted | Close-range area illumination; indoor use |
| Candela (cd) | Peak intensity at beam center | Determines how far you can identify a target (PID distance) |
For weapon lights, candela is the operationally decisive specification because it determines target identification distance. The Brinyte XP22 MK3 (1,600 lm, 35,000 cd, 374m) and T40 (1,650 lm, 60,000 cd on low/spot mode, 490m) are both optimized for long-range target identification rather than area flooding.
8. Laser Zero Shift: Why It Happens and How to Prevent It
Laser zero shift is the most common complaint from weapon light users who run integrated laser systems. It happens for two reasons: mount loosening and removal/reinstallation of the light.
The XP22 MK3 addresses the second cause directly: its magnetic charging port allows the battery to be charged on the rail without removing the light. The laser zero can only shift if the light physically moves on the rail. If the light never leaves the rail, the zero never drifts from the charging process.
Laser zero shift on rail-mounted weapon lights has two root causes: mechanical loosening from recoil, and physical removal of the light for charging or maintenance. Loctite 242 and proper torque (30 in-lbs M-LOK adapter, 20 in-lbs light body) prevent loosening. The XP22 MK3's magnetic side-charging port eliminates the second cause entirely — the light charges on the rail and never needs to be removed for routine battery maintenance.
9. Compatibility by Firearm Platform
| Platform | XP22 MK3 | T40 | Notes |
|---|---|---|---|
| AR15 / AR10 | ✓ Direct / Adapter | ✓ Same | Most common setup; offset mount at 1:30 recommended |
| AK variants | ⚠ Requires Picatinny handguard | ⚠ Same requirement | Confirm handguard rail spec before ordering |
| PCC | ✓ Excellent fit | ✓ Compatible | CZ Scorpion, Ruger PC Carbine, AR9 — all confirmed compatible |
| Shotgun (with rail) | ✓ Compatible | ✓ Compatible | Mossberg 590A1, Remington 870 with rail |
| Bolt-action with rail | ✓ Compatible | ✓ Recommended for hunting | T40 IR/multi-color ideal for hunting applications |
Ready to Build Your Rifle Lighting System?
Shop the XP22 MK3 and T40 — the only Brinyte lights designed for rail mounting with Picatinny clamps included.
🔦 Shop Weapon Lights →❓ Frequently Asked Questions
Can I mount Brinyte XP22 MK3 or T40 on an M-LOK handguard?
Yes, with a M-LOK-to-Picatinny rail section adapter (3-slot, aluminum, ~$10–15). Install the adapter first (30 in-lbs, Loctite 242), then mount the light onto the adapter rail (20 in-lbs, Loctite 242). Total installation time: under 10 minutes. See Section 2 for complete step-by-step.
Will the XP22 MK3 clear my LPVO or red dot?
Yes. The XP22 MK3's housing height is 14.55mm — significantly lower than standard weapon lights (30–40mm). This means the light body sits below the lower edge of virtually all LPVOs, prism scopes, and red dots when mounted at the 1:30 or 10:30 position.
What torque should I use for my weapon light mount?
Two critical values: 30 in-lbs for M-LOK adapter screws and 20 in-lbs for light body mount screws. Both require Loctite 242 (blue, medium-strength). These values align with Arisaka Defense's published M-LOK mount specifications. Re-check after first 50 rounds.
Why does my laser zero keep shifting?
Two most common causes: mount screws loosening under recoil (fix with Loctite 242 + proper torque), and removing the light to charge the battery. The XP22 MK3 eliminates the second cause with its magnetic charging port — the battery charges directly on the rail without removing the light.
What's the best position to mount a weapon light on an AR15?
The 1:30 or 10:30 offset position, near the front of the handguard — as far forward as possible, lens behind the muzzle device. This minimizes barrel shadow, puts the activation point where your support hand naturally rests, and keeps the light body below your optic's field of view.
XP22 MK3 vs T40 — which weapon light should I buy?
Choose the XP22 MK3 if you run an LPVO or red dot and need a light that won't obstruct your sight picture, plus an integrated green laser. Choose the T40 if you need multi-color capability (IR for night vision, green for hog hunting, UV for blood tracking), longer runtime, and a zoomable beam. Both mount identically on Picatinny; both need a M-LOK adapter on M-LOK handguards.
About Brinyte
Founded in 2009 — 50+ patents, ISO9001 certification. Brinyte builds tactical and hunting lighting with direct input from law enforcement and field professionals. All specifications measured to ANSI/PLATO FL1 standard.
"Engineered for the mission — proven in the field."
Founded 2009 · 50+ Patents · ISO9001